
| What is Flavor and Fortune? |
| How do I subscribe? |
| How do I get past issues? |
| How do I advertise? |
| How do I contact the editor? |
Read 15173520 times
Connect me to:
| Home |
| Articles |
| Book reviews |
| Letters to the Editor |
| Newmans News and Notes |
| Recipes |
| Restaurant reviews |
| Article Index (all years, slow) |
| List of Article Years |
| Article Index (2026) |
| Article Index (last 2 years) |
| Things others say |
| Related Links |
| Log In... |
| Authors |
| Categories & Topics |
Growing Your Own Shiitake Mushrooms
| by Leonard Newman |
Vegetables and Vegetarian Foods
Winter Volume: 2010 Issue: 17(4) page(s): 21 and 22
As you will see, growing your own Chinese black mushrooms, these days more commonly known by their Japanese mane of shiitake mushrooms, can be quite easy. Certainly doing so can be very rewarding. This Lentinula edodes is an edible mushroom native to East Asia. Shiitake, the Japanese word, that literally means 'tree oak' and that should immediately inform you as to how they are grown. In Chinese they are called xiang gu, literally meaning 'fragrant mushroom.'
There are two Chinese variant names for high grades of this mushroom. They are dong gu or 'winter mushroom' and hua gu or 'flower mushroom.' The latter are identified through the flower-like cracking pattern on their top or upper surface. Other names by which this mushroom is known in English include, Chinese black mushroom, black forest mushroom, and the oak mushroom.
These mushrooms can be used from their fresh state or reconstituted from the dry state. This latter way is the preferred method the Chinese like because drying the mushroom does intensify its flavor.
 The mushrooms are grown by impregnating oak logs with their spawn. The spawn can be obtained in two forms, either as plugs (easier to use but more expensive) or as sawdust (produce faster and are cheaper). Both of these can be purchased from a variety of sources one of which is Fungi Perfecti. That is where mine came from; they can be reached at: www.fungi.com
Before doing so, one needs some freshly cut oak logs, two to six inches in diameter and three to four feet in length works well. Some say not to use the logs immediately after cutting as they may contain a protective toxin that can kill the spores. I have found that allowing them two rest for two to three weeks after being cut, and then using them, is adequate. Logs more than a few months after cutting might have dried out for too long to be useful.
First one drills holes with a five/sixteenths-inch drill bit, doing so two inches deep if using the plugs, only one-inch deep if using the sawdust. The holes are spaced two inches apart down the entire length of the log. Additional rows are placed about two inches left and right going completely around the log. The plugs can then be tapped in with a hammer, and then using a piece of doweling push them slightly below the surface. I prefer the sawdust, and it is best pushed into the holes by placing some in a funnel and pushing it into the hole with a piece of doweling or a wooden chopstick. The sawdust needs to be compressed and pushed down to slightly below the surface.
In either method, melt some cheeze wax, which also is available from Fungi Perfecti, or do as I have done, get some bees wax from a friendly bee keeper. The melted wax is either poured over the filled holes or painted over with an old paint brush. In order to ease the work of drilling the holes you probably want to place the logs on something like a saw horse to elevate them. You also should invest in a good hard drill as anything less will quickly burn out.
The next task is to keep the logs wet for some two to three weeks. This is best accomplished by placing two waste logs on the ground and stacking the logs across them in layers. The waste logs will keep your now 'precious' logs off the ground so as not to permit them to rot. One needs to wet them down daily.
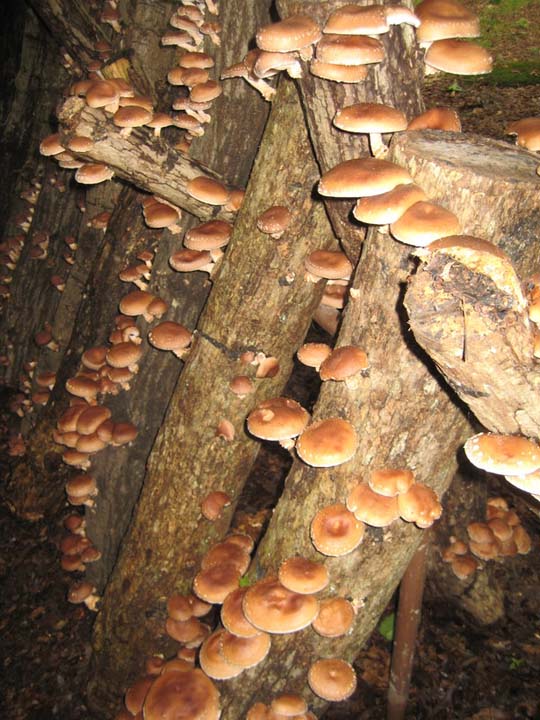
Once this is completed, place the logs upright along something like a railing, which you can either fabricate or use a section of a split rail fence. You should alternate the placement of the logs along the railing so that they do not touch one another and thus the mushrooms will not get deformed as they grow. Be sure to place this in a shaded area, since mushrooms need shade under which to grow. (The picture of freshly sprouted mushrooms shows my alternating logs.)
Be patient as it will now take some months for the spores to permeate the logs and start to produce mushrooms. Under dry conditions you might want to water the logs periodically. If you prepared the logs in early spring, there is a good chance that you will get your first mushroom production by that fall. It is best to prompt production by giving the logs a good soaking. This can be done with a sprinkler or as I do, place them in an old bathtub. I resurrected one from a dump, and placed it in the shade in my back yard. A good twenty-four hour soaking in the tub is just fine. Place some weight, I use small logs, on the ones being soaked to keep them under water.
I have found in my area, the logs produce mushrooms twice a year, once in the early spring and once in the early fall. In this manner the logs will produce as long as there is intact bark on them. They can last four to five years.
In the photo you see the spoils of my work in their second season. Now, the question is: What do you do with all of this type of mushroom? Of course, eat as many as you want, they keep up two weeks in the refrigerator covered with a damp paper towel that needs re-wetting every day if yours is self-defrosting as mine is. Also, do give some to appreciative neighbors and friends.
These mushrooms can be kept in a number of ways, but before storing them, do remove the stems which are only usable for making a mushroom stock. Without them, drying and storage space are maximized. Of course, if I were to sell them I would leave the stems on as that is extra weight.
You can dry them in a dehydrator or do so in an oven set at an exceptionally low temperature; but do be careful to not char them. You can also saute them in very little oil, maybe a teaspoon, in a ten-inch fry pan or a wok. After half to one minute per side, add one tablespoon each of soy sauce and Chinese black vinegar, turning them once or twice, and continue sauteeing until they stop sizzling. Next, allow them to cool.
Then place them in layers separated by two sheets of wax paper in a container and freeze them. Any that are mis shaped or less desirable, can best be cut up and sauteed with or without onions. These can be placed in small plastic bags, together put in a heavy freezer-weight one, and put away for later use.
Do try to grow your own Chinese black forest mushrooms as all you need is a small spot of shady land. It is not that much work, can be most rewarding, and it is a delicious treat when eating those you brought into this world!

Copyright © 1994-2026 by ISACC, all rights reserved
Address
3 Jefferson Ferry Drive
S. Setauket NY 11720